


Did you know that 88% of consumers are more likely to buy a product from a brand after they purchased something from the brand at least 3 times?
Nowadays it’s difficult to get customers invested enough to go to a physical shop once, let alone three times.
That’s why it’s nearly impossible to grow without having a online store with all of your products.
If you’re here, you might be wondering how to start a Shopify store without it taking months for it to be done. Lucky for you, this article shows you all the steps you need to take to get your Shopify store running in no time.
But why would you want to know how to start a Shopify store in the first place?
There are several reasons why you should care and consider having a good Shopify store this year.
Almost every brand has gone digital.
Unless your brand mostly grows from people going to your physical store, having a digital store is mandatory.
Think about it this way: there are more than 4 million businesses using Shopify to fulfill their sales and grow online.
As the years go by, this number will only go up as more and more companies understand the importance of selling online.
This means that you have little to no time to waste when it comes to building your own Shopify store.
Do you want a Shopify store that actually works but don’t know where to start? Let us help.
Quick 9 Step Guide on How to Start a Shopify Store
This article will serve as your go-to guide on how to start a Shopify store and making it work properly.
From the technicalities that come from owning an online store to how to maintain it without it breaking.
Below, we organized 9 of the steps you’ll need to follow to properly learn how to start your Shopify store and get it up and running.
You shouldn’t overlook any step or try to skip to the customization part instantly. Each part is necessary for your Shopify website to look its best.
Step 1: Create Your Account
The first step for any Shopify store is to create an account and verify it. As soon as you land on their website, click on the “start a free trial” button that is on the top right of the website.
Once on the next page, you’ll get a few questions thrown your way; you can answer them if you want Shopify to help you pick the ideal plan for you. You can also opt to skip it altogether if you already know which one you need.
Pick your plan
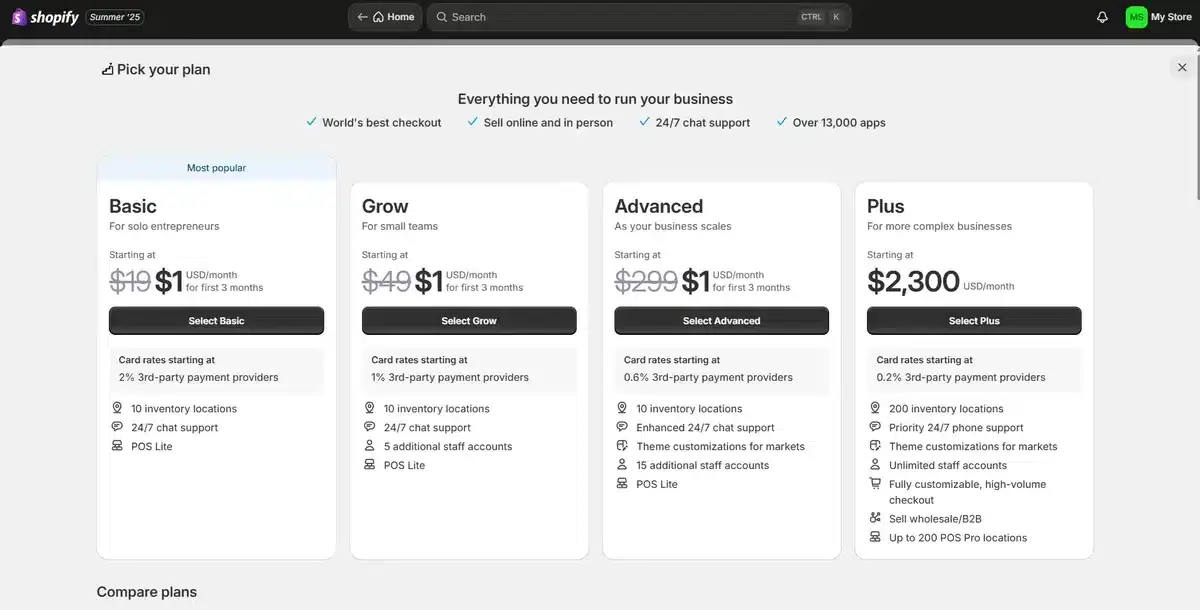
Once you go through the questions, a page will show you all of the available plans it has.
If you’re a brand with a catalog of products, we recommend the Grow plan since it’s the sweet spot between features and cost.
While the Advanced plan is great due to lower transaction fees, it is still a bit expensive at $299 per month for smaller brands.
If you want to save some extra money, you can always pay for the annual plan and get 25% off the total cost of your plan.
All the plans also offer a quick three-day trial so you can test and see if it’s what you need. Not to mention their first 3 months costing only $1 per month regardless of the plan.
Think about your domain name
Make sure you pick a good domain name that reflects your brand while also being memorable. You should make sure to think about this thoroughly since it is the main part of your website URL.
While you can change it later on if needed, it’s best to have it set from the start.
Step 2: Explore the Features and Controls in the Admin Panel
Once you set up your account with a strong password and a creative domain name, you’re ready to learn about the features and controls you’ll use every day.
Once you find the admin panel, you’ll notice quite a few options to learn about.
Let’s go over each of them:
Products: This is where you can manage, add, or delete your products. This includes setting prices, writing descriptions, and more.
- Finances: You can check everything related to your revenue, profits, and expenses here. This makes it easy to find out how well you’re doing and if you need to adjust your strategy somewhere.
- Customers: Here is where you can check the list of past and current clients. This includes all of their contact information, as well as their recent orders.
- Orders: This is a place you’ll be constantly checking! Here you can check all your store’s orders as well as how the shipping is doing, if someone has canceled an order, and even if someone left a review.
- Analytics: You definitely can’t have an online store without being able to track your stats. With this, you’ll be able to check how each product is doing over a set period of time. You can view them individually or by customizable groups.
- Discounts: If you want to create a discount code for your customers to use, you’ll make them here. From simple ones such as free shipping when they spend a set amount of money to specific discounts on products of your choice.
- Apps: Extensions will be added and modified here. If you find an extension that could help make your website better, you’ll find it here after you install it. You’ll also be able to search for new apps from this page as well.
- Marketing: This is where you can apply the marketing strategies you had planned for your Shopify store. You can create promotions and share them on various social media platforms and marketing channels from here.
- Content: Here you’ll be able to create content for your online store. Blog posts, videos, and images specifically.
Step 3: Gather All the Essential Information You’ll Need
While it should be obvious, we wanted to make sure that you had all of the important information you’ll need when building your website.
These include:
High-quality pictures and videos: Since you’re setting up an online store, you need professionally shot images and videos that can help people thoroughly check the products you’re selling. We recommend each product has at least 5 pictures for you to use for its product page. If possible, you could even add a video so potential customers can see you using the product in real time.
- Pricing: This should go without saying, but you should know what price each product you’re selling will be. Remember to take into consideration the transaction fees that Shopify has for each item sold.
- Brand guidelines and stylebook: This is optional since not every brand has a fully created guideline and stylebook, but if you do, now is the perfect time to put it to use.
Once you have all these things ready, we can move on to the next step, which is picking the right theme for your brand.
Step 4: Browse and Pick a Theme
When you first set up your Shopify account, the standard theme that Shopify provides for all new users will greet you.
While it’s not a bad theme, we recommend that you browse different themes by going to the admin panel and clicking on the Online Store button.
With the sheer amount of themes and customization options, it’s hard to look similar to any other brand unless you use the basic Shopify theme.
Here you’ll get an option to go for either a free theme or a paid theme. Either of them works, although we would suggest you pick something paid to avoid having a store that looks too much like others out there.
Once you find the theme you want, add it to your theme library by clicking the “Add” button.
If you’re unsure of how your theme will look when visitors check your store, you can check by pressing the preview option in the theme library block.
This makes it easy to check how your store looks and what you would need to change to make it fit your brand identity that much more.
When learning to start a Shopify store, many owners wonder if their store will be unique compared to competitors.
Now that you know which theme you’ll be using, we can move on to the fun part, which is customizing your digital store!
Want to revamp your digital store so it gets higher conversions? We can help.
Step 5: Customize Your Website
When thinking about how to start your Shopify store, the first thing that might come to mind is customization. Customizing and making sure your Shopify website looks its best is mandatory if you want to sell more and grow online.
Be warned though, properly customizing your website and having everything ready won’t be a 2-hour adventure.
Getting everything ready might take days and sometimes even weeks to set up depending on how many pages you have and how much detail you need.
This means that you should plan ahead and make sure all of the other aspects of your brand are set before starting this project.
The first thing you want to do is modify and adjust the theme. This includes changing the fonts and colors mostly. If you have a stylebook, this is the perfect time to use it; if you don’t have one, then it might take a bit more work to get this ready.
Once you have colors and fonts figured out, you can move on to layouts. Changing the layout is entirely up to you. In general, less is more when it comes to layouts. You want your visitors to spend more time on your product pages. Avoid complicated navigation to keep them engaged.
Now that you have the basics set, let’s move on to the main time sink of creating a Shopify website.
When customizing your Shopify store, focus on key sections. These areas are crucial for any successful online store, regardless of your niche or industry.
Focus on your homepage
Your homepage is the first page most visitors will see when they find your Shopify store. This is why it needs to look its best while also hooking visitors into wanting to know more about your brand and its products.
If you’re unsure how to build your homepage, look at your top competitors or other successful sites for ideas.
We reviewed and talked about some of the nicest-looking minimalist websites in one of our latest articles. You can use them as inspiration if you are not sure what to do with your homepage just yet.
If you don’t think a minimalist homepage would look good with your brand, you can also try some creative small business websites like these that we covered this year as well.
With some inspiration and set ideas, you should be able to create your own homepage in a matter of days.
Product/Service pages should be perfect
While a single product page might not take as much time to create and edit, when you have dozens of products, it starts to add up. Everything about product pages is important, from the images to the descriptions.
You want to entice visitors to buy your product without making them feel forced to make a purchase.
To create a product page, all you have to do is go to the product section in your admin panel and click on “add product.” Give your product a name and press save. When your page is ready, click “edit.” Then, add details to your product page. You can include the description, images, videos, and specifications.
You can also duplicate products to save time if there are products with similar descriptions and images.
Mobile use
While almost every verified theme has a fully functional and good-looking mobile version of your Shopify store, it’s mandatory that you check if they provide image size and font size requirements.
If you adhere to them, your pages will all look good, no matter the device used to view them.
Add intuitive navigation
Even if your Shopify store looks great, it won’t matter unless it’s easy to navigate.
If you want to see what navigation options you have by default on Shopify, you can go to the admin panel, click on “Online Store,” and then “Navigation.”
You can create navigation features such as a nested menu where you can add product links in a dropdown style for easier access. You can also create and edit the main footer that will be on every page in your Shopify store.
If you don’t know what to do or add in your footer, we can give you some inspiration with our latest footer example article.
About page
Last but not least, we have the about page. This one is straightforward and doesn’t require much prep apart from your writing and explaining everything about your brand.
Make sure to talk about everything related to your brand and why visitors interested in your products should care about your brand as a whole. Give them a reason to care and stay.
Now that you have the main pages up and running, you can set up and organize your cart and checkout pages.
Step 6: Activate your Payments
When thinking about how to start a Shopify store, an area that most people overlook completely until it’s too late is how to set up payments.
If you don’t have a good payment section, you may lose customers. Frustrations like limited payment options or a broken page can drive them away.
Here are a few things you’ll need to do in order to verify and set up your business payment.
Shopify payment eligibility: Check this list of supported countries and make sure that your location is eligible for Shopify Payments. The last thing you want is to get your website ready only for you to not be able to sell your products
Activate 2FA: This should go without saying, but make sure that you have 2FA on for your Shopify account. The last thing you want is for a hacker to gain access to all of your information due to a lack of security on your end.
Add your store currency: Add the main currency that you’ll use to sell your products on your page. Remember it should be the currency you’ll be expecting to get the most from to avoid conversion rates.
Enable Shopify Payments: To enable Shopify Payments, open the admin panel, go to Settings, and click on “Payments.” After that, pick the “Activate Shopify Payments” button and follow the steps.
Provide necessary details: Double-check that all of the information asked for is correct and in order. This information varies by country. Typically, they will ask for your EIN, Business Number, Taxpayer Identification Number, and some personal details. This helps confirm someone represents the store.
Add your VAT number: This is only for European countries, but make sure to add your VAT number. They will verify if the number is correct and in working order, so make sure that you add it correctly.
Once you have all of this done, all you have to do is wait for them to verify that all of the information is correct. Once they verify you, you can adjust your payment settings to make sure everything is as it should be.
Step 7: Customize your Checkout
Now that you have your Shopify Payments ready, we can move on to creating and customizing your checkout.
Creating a checkout is simple, especially if you have all of the information needed (which you should have by now).
First, we want to add a checkout button by going to the settings and clicking on the checkout link.
Once added, make sure to customize your checkout so it looks and feels the same as the rest of your website. There are also settings for both shipping and tax rates that we will talk about in the next step.
Once all of that is done, you’ll have a completely functional checkout page ready.
Step 8: Check Your Shipping and Tax Rates
Making sure that your shipping and tax rates are in order is crucial if you want to ensure that you are not losing money.
Let’s go through what you need to have to keep your shipping rates in check.
Shipping
The first thing you’re going to need is to go to your settings and click on the “shipping and delivery” section, then pick which profile you’ll be working with.
Afterwards, you’ll have access to all the details you have for your shipping. Now you can add your shipping rate by clicking on “add rate.” Remember to enter the name for the rate and what the applicable rate value is.
Depending on your product, you’ll need to pick certain conditions that will change the cost of your shipping. This includes price, weight, and sometimes even size. While this is optional, some brands might require it due to the big shipping costs their customers would have to pay.
Once you have your rate set, make sure to save by clicking the “done” button as well as the “save” button right after.
If you use an external Shopify plugin for shipping rates, you can skip this step. However, if you use Shopify Payments, you can set flat fees in the local currency. This makes it easier for customers.
Tax Rates
The first thing you need to do for your eCommerce website before calculating your taxes is to check if you even need to add taxes to your products or not. Depending on the country and state, it may or may not be applicable. Make sure you do your tax research beforehand.
Once you have that sorted, you’ll want to go back to settings, then click on the “taxes” section. It will ask you what country your store is from; click your country, then press continue.
Next you’ll need to click on the collect sales tax button to organize and set up your tax collection for your country. Once you complete that, make sure to go to the “tax number section” and add your tax number.
After you finish, click on “collect tax” to confirm that everything is set for the chosen country.
You can do all of this multiple times if you need to collect taxes for several countries as well.
This page offers many settings and features. It includes tax exemptions, calculations, and tax overrides. These AI tools help ensure your tax rates are correct.
Step 9: Test That your Shopify Store is Working Properly
You started from wanting to know how to start a Shopify store to this; you can finally launch your store and get your first client, right?
No! Before you launch your Shopify store, you want to make sure that everything is working correctly. The last thing you want to do is launch an online store that isn’t working as intended.
To make sure everything works well, go to settings. Next, click on “payments,” then “edits.” Look for the option “use test mode.” Check this option and save your changes.
Once you complete this, you can safely test your online store from start to finish. Grab any product from one of your product pages, go to the cart, and proceed to checkout. Once here, you can either use your credit card for this test or use the following details:
Card Name: any two words
- Expiration date: any date in the future
- CVV: pick any three numbers
- Card number: Depending on the card type, you’ll want to use the following numbers:
Discover: 6011111111111117
- American Express: 378282246310005
- Mastercard: 5555555555554444
- JCB: 3530111333300000
- Visa: 4242424242424242
- Diners Club: 30569309025904
This will let you try out every major bank service and see if it works without charging anything.
If everything is looking good on your end, you can finally get ready to officially launch your Shopify store!
Just go to your online store. Click on Preferences. Find the “Password Protection” section. Then, click on “Restrict access to visitors with the password.” You’re all set!
Now after carefully reading how to start a Shopify store and following every step, you are the proud owner of a complete and fully functional Shopify store.
Get a Custom Shopify Store That Converts With Blacksmith
We started this article with a simple question, “how to start a Shopify store,” and went all the way to showing you how to test your Shopify store once it’s done.
With all the information in this article, you’ll be able to create a Shopify store in a matter of days.
But we know that you have other things to do for your business as well, and as you saw above, creating a good Shopify store takes a lot of time and planning.
Don’t worry, with Blacksmith you’ll be able to work on other aspects of your business while we work on creating the best Shopify store for your business.
As an end-to-end eCommerce development company, we have seasoned web developers ready to create and optimize your Shopify store from the ground up. We’ll ensure that you stand out from the competition and keep your conversions high.
Not sure if a new Shopify store is what your brand needs to keep growing? Click here to schedule a call with us so we can show you how much money you’re losing by not having your own digital store.


